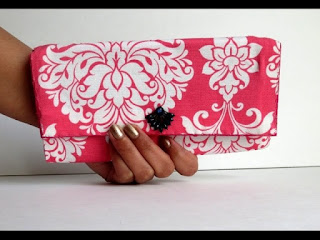
HOW TO MAKE A FABRIC PURSE
Materials needed;
1). Fabric
2). Scissors
3). Glue spray
4). Fancy buttons
5). Brush
6). Measuring tape
7). Glue gun
STEPS INVOLVED
Step 1: Define the size of your clutch, measure with your tape. It depends on how large you want your bag and how much Ankara fabric you have. A height of 10cm by 20cm would be perfect. Thus you need three equal pieces of cardboard of 10 by 20 cm. A firm and thin cardboard will be preferable for a thinner clutch. You need three fabric pieces; 2 unicolor and 1 Ankara. It should be 23 cm wide and 36 cm long. Place your card piece on the material in such a way, that the first one would leave 1 cm over-measure, then the next, you make a gap of 2 cm and place the next one, two more cm and the last one and leave 1 cm of over-measure.

Step 2: Glue together the clutch foundation
Use glue spray on one side of cardboard and place it on the fabric, do with all three of them. Now use hot glue gun to roll over the edges on all four sides. Now you have three cardboard pieces attached to the fabric.
Place your Ankara face down on the table, locate the foundation on the top (cardboard open side down) and outline it using a pen or a pencil (the cardboard piece should be smaller than the Ankara, because its edges are clipped). The same thing is done with the second uni-color piece.
Remove the foundation. Use hot glue gun to clip the over-measure edges of Ankara. Now you have the foundation and Ankara fabric of the same size. Place Ankara face up on the foundation (on the cardboard open side) and stick it down with the hot adhesive(glue).
Now your foundation is almost complete. Turn it over (Ankara part down). You may see the cardboard through the uni-color fabric layer. Use your second uni-color piece to cover this side over, make it stronger and smoother with no cardboard in sight. You just glue it over the first uni-color layer. You can fold the clutch. It has to sides and no pouches yet.

Step 3: Glue the inner parts
You can make 1 or 2 inner compartments. Just cut out 1-2 pieces of Ankara or uni-color fabric the size of the cardboard (11x21). Bend the 0.5 cm on each side, clip and glue down. You get an even rectangular.
Now you unfold the foundation and glue its three sides (leaving out the top one) on the uni-color side to the middle cardboard piece. You can also make few smaller pieces for pouches. They cab by 11x11 cm. You also clip and join the 0.5 cm on each side of the fabric. You can put the pouches on the top of the main compartment of the Ankara bag. The second compartment can be fastened to the lower cardboard piece with the low edge unglued.

Step 4: Make clutch sides
Cut out two small Ankara pieces (6x7 cm), clip their edges (0.5 cm). There are your sides. Fold the clutch. The sides would be fastened between the middle and the lower cardboard pieces. Place one aligning it with the top edge and glue to the sides. The bottom part of cardboard would remain with no side attached. You just stick the two bottom parts together. This side would make the purse open wider for you to put or take things out.

5 Attach the clamp and Decorate
You may use a piece of Velcro as your clamp. The front of the Ankara bag can be decorated with a metal décor piece, with a bead or a fabric (or leather) flower. Use hot glue to fasten them.
These two tutorials on how to make Nigerian Ankara bags can help you to get crafty and create your own accessories. You can make as many as you wish with very little money spent on your fashion projects.
There are lots of other methods....stay tuned to learn more!


Comments
Post a Comment